Choosing between diamond e file bits, carbide e file bits, and ceramic nail drill bits can feel overwhelming when you’re building your professional nail kit. The material of your e-file bit fundamentally determines its performance, longevity, and suitability for specific nail services—and making the wrong choice can compromise your work quality whilst limiting your technical capabilities.
This comprehensive guide examines all three e-file bit materials in depth, helping nail technicians and beauty students understand exactly which material to choose for cuticle work, product removal, nail preparation, and every other aspect of professional nail services. You’ll learn the unique properties of each material, when to use them, how they perform in real-world applications, and how to build an effective bit collection that covers all your service needs.
According to industry research, professional nail technicians typically use 8-12 different e-file bits regularly, with diamond and carbide bits accounting for approximately 80% of salon applications (Professional Beauty Association, 2024). Understanding the material differences ensures you invest in the right tools from the start.
Understanding E-File Bit Materials: The Fundamentals
What determines an e-file bit’s material properties? E-file bit materials are classified by their abrasive composition and manufacturing process, which directly influence cutting efficiency, heat generation, durability, and appropriate applications. The three primary materials—diamond, carbide, and ceramic—each offer distinct mechanical properties that make them suitable for different nail service requirements.
The Science Behind Bit Materials
The effectiveness of any e-file bit depends on its abrasive characteristics and structural composition:
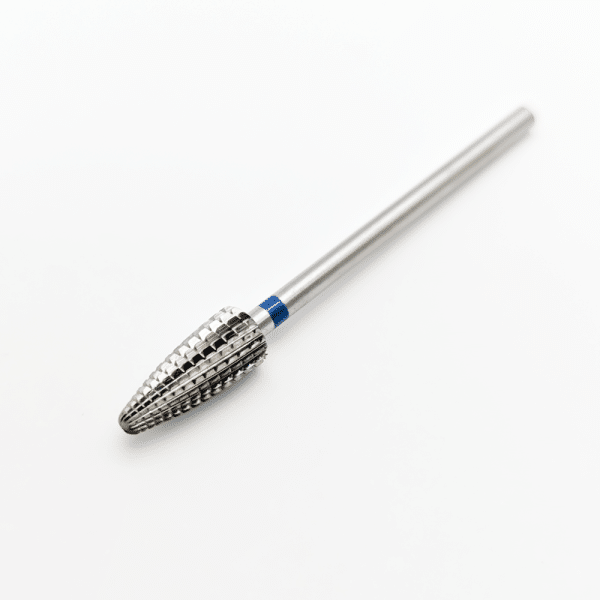
Diamond bits feature industrial diamond particles bonded to a metal base, typically stainless steel or brass. The diamonds themselves aren’t large gemstones but microscopic industrial-grade crystals that create an extremely hard, consistent abrasive surface. According to materials science research, diamond ranks 10 on the Mohs hardness scale, making it the hardest naturally occurring substance and ideal for precision work (International Gem Society, 2024).
Carbide bits are manufactured from tungsten carbide, a compound of tungsten and carbon atoms that creates an exceptionally hard ceramic material. These bits feature cutting flutes—precisely machined grooves that create a blade-like cutting action. Carbide ranks approximately 9 on the Mohs hardness scale and offers superior cutting efficiency for product removal.
Ceramic bits utilise aluminium oxide or similar ceramic compounds bonded together and fired at high temperatures. These materials rank approximately 7-8 on the Mohs hardness scale, providing a gentler abrasive action that generates minimal heat during use.
How Material Affects Performance
The material composition directly influences three critical performance factors:
Heat generation: Different materials create varying levels of friction and heat during use. Ceramic bits generate the least heat, making them ideal for sensitive areas and extended use on natural nails. Diamond bits produce moderate heat levels, whilst carbide bits can generate significant heat when used aggressively, particularly with coarse grits.
Cutting efficiency: Carbide bits offer the most aggressive cutting action, removing product quickly but requiring careful control. Diamond bits provide controlled, consistent abrasion suitable for precision work. Ceramic bits offer gentle, gradual abrasion ideal for delicate areas.
Longevity and wear patterns: Diamond bits typically last longer than carbide or ceramic alternatives because the diamond particles maintain their cutting ability even as they wear. Carbide bits gradually dull as the cutting edges wear down, whilst ceramic bits may chip or break under excessive pressure.
Material Selection and Client Safety
Choosing appropriate bit materials directly impacts client comfort and safety. Research published in the Journal of Cosmetic Science indicates that excessive heat during nail services can cause discomfort and potential nail bed damage, making material selection crucial for professional practice (Journal of Cosmetic Science, 2023).
Key safety considerations include:
- Heat-sensitive clients benefit from ceramic or fine-grit diamond bits
- Natural nail services require gentler materials to prevent over-filing
- Product removal demands efficient materials to minimise service time
- Cuticle work needs precision materials to avoid skin irritation
Understanding these fundamental differences enables informed material selection for every service scenario you’ll encounter in professional practice.
Diamond E-File Bits: Properties and Applications
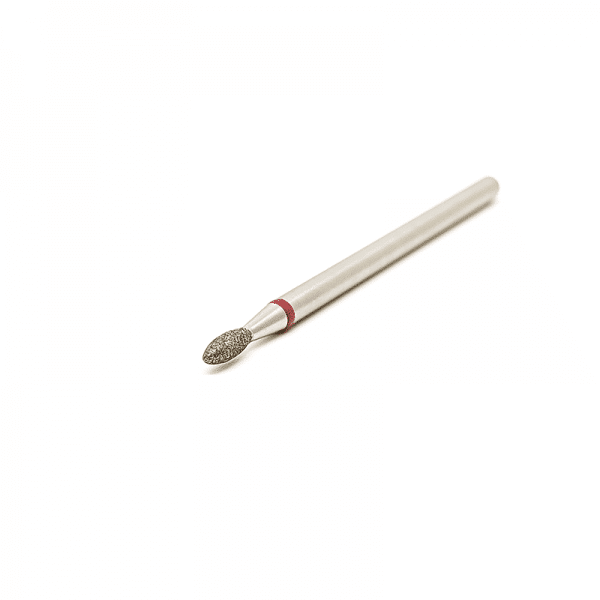
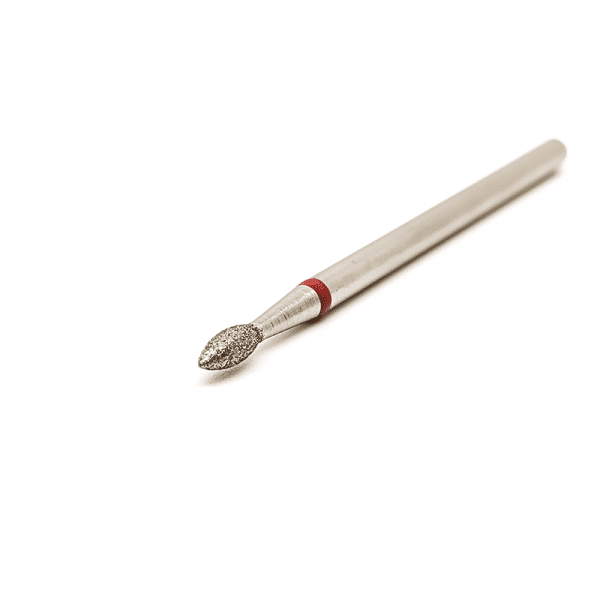
Why are diamond nail drill bits considered the most versatile choice? Diamond e file bits offer exceptional precision, consistent performance, and remarkable longevity, making them the preferred choice for detailed work, cuticle care, and natural nail services. Their fine, even abrasive surface provides controlled material removal without excessive heat generation.
Diamond Bit Construction and Quality Grades
Diamond bits vary significantly in quality based on their construction method and diamond particle density:
Silver-coated diamond bits represent the highest quality tier. These bits feature a thick layer of industrial diamond particles electroplated onto a stainless steel base, creating a durable, long-lasting tool. Professional-grade silver-coated bits can maintain their abrasive properties through hundreds of services when properly maintained.
Gold-coated diamond bits utilise brass or copper-alloy bases with diamond particles bonded to the surface. The gold appearance comes from the brass base material, not actual gold plating. These bits typically offer moderate quality and durability.
Low-grade diamond bits may feature sparse diamond particle coverage or inferior bonding processes that result in rapid wear and inconsistent performance. These bits often lose effectiveness after minimal use and represent poor long-term value.
According to industry quality standards, professional diamond bits should feature uniform particle distribution with no visible bare patches on the working surface (British Association of Beauty Therapy & Cosmetology, 2024).
Diamond Bit Grit Specifications
Diamond e file bits are available in multiple grit grades, each suited to specific applications:
Extra coarse (80-100 grit): Reserved for aggressive product removal and callus reduction in pedicure services. These should not be used on natural nails or delicate areas.
Coarse (120-150 grit): Suitable for efficient removal of gel polish, acrylic, or builder gel products. Requires steady hand control to avoid over-filing.
Medium (180-240 grit): The most versatile grit range for general nail preparation, light product removal, and surface refinement. This grit range suits most everyday applications.
Fine (280-320 grit): Ideal for cuticle work, nail surface smoothing, and delicate area refinement. Fine diamond bits excel at precise, controlled material removal.
Extra fine (400+ grit): Used for final smoothing, shine enhancement, and ultra-gentle cuticle work. These bits provide minimal material removal and maximum control.
Primary Applications for Diamond Bits
Diamond nail drill bits excel in these professional applications:
Cuticle preparation and cleaning: Fine-grit diamond bits safely remove dead cuticle tissue and clean around the nail plate without causing irritation. The Safety Cone or Ball diamond bit shapes work particularly well for this application, offering precise control in tight spaces around the nail fold.
Under-nail cleaning: Diamond bits effectively clean underneath the free edge without causing damage or discomfort. The cone or needle shapes reach into tight spaces whilst the diamond abrasive gently removes debris.
Nail surface preparation: Medium-grit diamond bits prepare the nail plate for product application by creating appropriate surface texture for optimal adhesion. This application requires light pressure and proper technique to avoid over-filing.
Gel polish and soft gel removal: Diamond bits efficiently remove gel polish and soft gel products when used at appropriate speeds with proper technique. Unlike carbide bits, diamond bits remove product through abrasion rather than cutting, reducing the risk of natural nail damage.
Surface refinement: Fine and extra-fine diamond bits smooth product surfaces, blend extension edges, and refine nail contours without creating excessive heat or vibration.
Advantages of Diamond E-File Bits
Professional nail technicians favour diamond bits for several compelling reasons:
Consistent, predictable performance: Diamond bits maintain steady abrasive properties throughout their working life, providing reliable results across multiple services. This consistency enables precise work control and reduces the learning curve when mastering new techniques.
Minimal heat generation: The fine abrasive action of diamond particles creates less friction than cutting-style carbide bits, significantly reducing heat generation during use. This property makes diamond bits particularly suitable for extended work on natural nails or sensitive areas.
Extended durability: High-quality diamond bits can last significantly longer than carbide or ceramic alternatives. Professional technicians report using the same silver-coated diamond bits for 6-12 months of regular salon use before replacement becomes necessary (Professional Nail Technician Survey, 2024).
Versatility across services: A well-chosen selection of diamond bits in various grits and shapes can handle the majority of nail service requirements, from preparation through finishing. This versatility makes diamond bits excellent foundations for technicians building their initial kit.
Natural nail safety: The controlled abrasive action of diamond bits reduces the risk of accidentally over-filing or damaging the natural nail plate—a critical consideration for nail health and client retention.
Limitations and Considerations
Despite their advantages, diamond bits have some limitations:
Slower product removal: When removing thick acrylic, hard builder gel, or multiple gel polish layers, diamond bits work more slowly than coarse carbide alternatives. This can extend service time for removal appointments.
Grit selection complexity: The wide range of available grits requires knowledge and experience to select appropriately for each application. Using too coarse a grit on natural nails or too fine a grit for product removal leads to poor results.
Performance degradation with poor maintenance: Diamond bits lose effectiveness quickly if not properly cleaned and sanitised. Product buildup between diamond particles significantly reduces cutting efficiency.
Best Practices for Diamond Bit Use
Maximise your diamond bit performance with these professional techniques:
Match grit to application precisely: Use the finest grit that accomplishes your task efficiently. Over-relying on coarse grits increases heat, discomfort, and damage risk.
Maintain appropriate speed: Diamond bits typically perform best at moderate speeds (8,000-15,000 RPM for most applications). Excessive speed increases heat without improving efficiency.
Use light, consistent pressure: Let the diamond abrasive do the work rather than applying heavy pressure. Excessive pressure generates unnecessary heat and accelerates bit wear.
Keep bits moving constantly: Avoid dwelling in one spot, which concentrates heat and can cause discomfort or damage. Maintain smooth, sweeping motions across the work area.
Clean frequently during use: Remove product buildup regularly during service to maintain optimal bit performance and prevent cross-contamination between clients.
Diamond e file bits represent the cornerstone of professional nail technician tool kits, offering versatility, safety, and reliability across the widest range of applications.
Carbide E-File Bits: When Cutting Power Matters
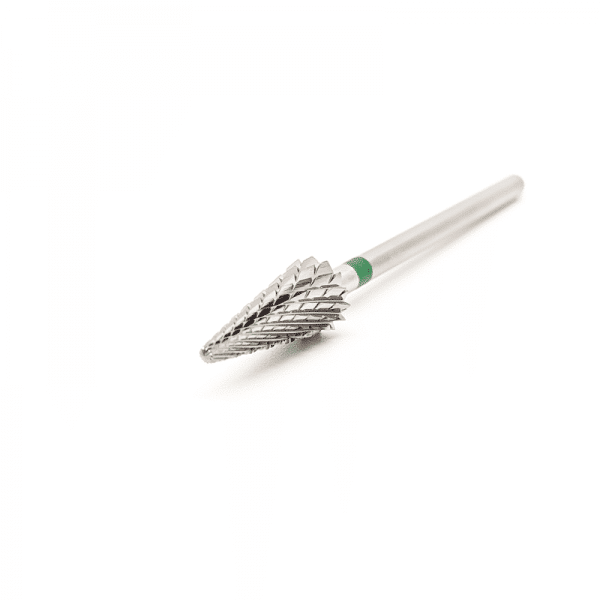
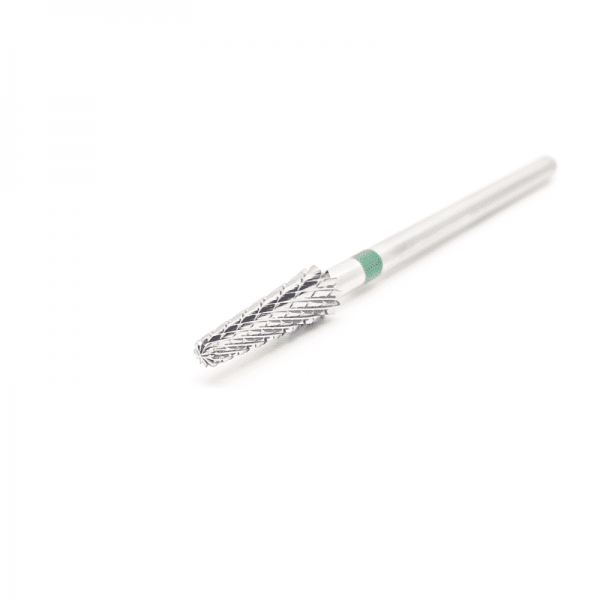
What makes carbide nail drill bits the most efficient choice for product removal? Carbide e file bits feature precisely machined cutting flutes that slice through enhancement products with exceptional speed and efficiency, making them indispensable for removal services and bulk material reduction. Their aggressive cutting action removes product significantly faster than diamond or ceramic alternatives.
Carbide Bit Engineering and Design
Carbide bits are manufactured through sophisticated precision machining processes:
Tungsten carbide composition: The bit material comprises tungsten carbide particles bonded together through a sintering process, creating an exceptionally hard, wear-resistant material. This composition provides the structural integrity necessary for aggressive cutting without bit degradation.
Cutting flute configuration: The distinctive grooves machined into carbide bits create sharp cutting edges that shave away material rather than abrading it. The number, depth, and angle of these flutes determine the bit’s cutting characteristics and aggressiveness.
Crosscut patterns: Most professional carbide bits feature crosscut flute patterns that prevent clogging and improve debris evacuation during use. These crossed grooves break up material into smaller particles that clear away from the work area efficiently.
Carbide Bit Classification Systems
Professional carbide bits are categorised by their cutting characteristics:
Coarse carbide bits: Feature widely spaced, deep cutting flutes that remove material very aggressively. These bits excel at bulk product removal but require significant skill and control to use safely. Coarse carbide bits are typically reserved for acrylic removal and are unsuitable for natural nail work.
Medium carbide bits: Offer moderate cutting efficiency with more closely spaced flutes. These bits balance removal speed with control, making them suitable for general product reduction and shaping of enhancement products.
Fine carbide bits: Feature very closely spaced, shallow cutting flutes that provide controlled material removal. Fine carbide bits bridge the gap between aggressive removal and precision work, suitable for detailed shaping and refining.
Safety carbide bits: Also called “no-scratch” carbide bits, these feature very fine flute patterns specifically designed to avoid catching or gouging. They’re engineered for use near the natural nail with reduced damage risk.
Primary Applications for Carbide Bits
Carbide nail drill bits excel in these specific scenarios:
Acrylic removal: Carbide bits efficiently remove acrylic enhancements with minimal effort, significantly reducing removal service time. A medium or coarse carbide bit can remove bulk acrylic in minutes, whilst a fine carbide bit refines the surface as you approach the natural nail.
Hard gel and builder gel removal: Thick builder gel products and hard gel enhancements respond well to carbide bits’ cutting action. The bits slice through cured gel products that would take considerably longer to remove with diamond bits.
Gel polish removal in multiple layers: When removing several coats of gel polish or gel products built up over multiple services, carbide bits expedite the process significantly compared to gentler alternatives.
Product shaping and contouring: Carbide bits excel at shaping enhancement products during application, reducing length, adjusting contours, and creating precise structural elements in sculptured nails.
Callus reduction: Coarse carbide bits effectively remove callused skin during pedicure services. Specially designed callus reduction bits feature safety mechanisms to prevent over-filing.
Advantages of Carbide Bits
Professional technicians value carbide bits for distinct benefits:
Superior removal efficiency: Carbide bits remove product faster than any other bit material, dramatically reducing service time for removal appointments. This efficiency translates to improved appointment scheduling.
Clean cutting action: The slicing action of carbide flutes creates cleaner cuts than the abrading action of diamond bits, producing less dust and clearer visibility of the work area.
Reduced client fatigue: Faster removal means shorter appointment times, reducing client discomfort from extended e-file use and minimising the fatigue associated with lengthy removal services.
Effective on challenging products: Carbide bits efficiently handle products that prove difficult with other bit materials, including very hard acrylics, thick builder gels, and densely layered gel polish.
Limitations and Safety Considerations
Carbide bits require careful use due to several important factors:
Higher heat generation: The aggressive cutting action and friction created by carbide bits generate more heat than diamond or ceramic alternatives. This heat can cause significant client discomfort if proper technique isn’t maintained.
Greater damage risk: Carbide bits can damage the natural nail plate very quickly if used incorrectly. The cutting flutes will shave away natural nail as readily as enhancement products, making precise control essential.
Steeper learning curve: Mastering carbide bit technique requires more practice and skill development than diamond or ceramic bits. New technicians should practice extensively on training hands before using carbide bits on clients.
Shorter effective lifespan: Carbide bits gradually dull as their cutting edges wear down through use. Once dulled, they become significantly less effective and must be replaced. Professional carbide bits typically require replacement every 2-4 months with regular salon use (Professional Beauty Equipment Suppliers, 2024).
Clogging potential: Despite crosscut patterns, carbide bits can become clogged with product debris during aggressive removal, requiring frequent cleaning to maintain efficiency.
Carbide Bit Safety Protocols
Follow these essential safety practices when using carbide bits:
Never use directly on natural nails: Carbide bits should only contact enhancement products or callused skin, never the natural nail plate. The aggressive cutting action can thin or damage natural nails in seconds.
Maintain constant motion: Keep carbide bits moving continuously across the work surface. Pausing in one location concentrates heat and dramatically increases damage risk.
Use appropriate speed settings: Carbide bits typically work best at moderate to high speeds (12,000-20,000 RPM) for product removal. However, reduce speed when working near the natural nail to maintain better control.
Apply minimal pressure: Let the cutting flutes do the work. Excessive pressure increases heat generation, accelerates bit wear, and reduces control. Light, sweeping motions provide optimal results.
Monitor heat carefully: Check temperature regularly by touching the work area with your finger. If it feels warm to your touch, it’s too hot for client comfort. Reduce speed, lighten pressure, or allow cooling time.
Leave a thin product layer: When removing enhancements, leave a thin layer of product over the natural nail and remove it carefully with a gentler bit or manual filing. This approach prevents accidental natural nail damage.
Optimal Carbide Bit Technique
Professional carbide bit use requires specific technical approaches:
Start with bulk removal: Use a coarse or medium carbide bit to remove the majority of enhancement product efficiently, staying well clear of the natural nail initially.
Transition to finer bits: Switch to a fine carbide or diamond bit as you approach the natural nail, allowing for increased control and reduced damage risk.
Work in sections systematically: Address one nail area at a time, ensuring even removal rather than spot-working across the nail. This systematic approach prevents uneven thinning and missed areas.
Clear debris frequently: Stop periodically to brush away product dust and debris, maintaining clear visibility of your work area and progress.
Assess remaining product thickness: Check regularly to avoid removing too much product in one pass. It’s better to make multiple light passes than one aggressive pass that risks natural nail damage.
Carbide e file bits represent powerful, efficient tools that significantly enhance removal service speed when used with proper technique and respect for their aggressive cutting characteristics.
Ceramic E-File Bits: The Gentle Alternative
What makes ceramic nail drill bits ideal for heat-sensitive work? Ceramic bits generate minimal heat during use whilst providing gentle, controlled abrasion, making them the safest choice for natural nail work, sensitive clients, and extended-duration services. Their unique thermal properties and gentle cutting action reduce discomfort and injury risk.
Ceramic Bit Composition and Manufacturing
Ceramic bits are produced through specialised high-temperature processes:
Aluminium oxide base: Most ceramic bits comprise aluminium oxide (corundum) particles bonded together through sintering—a process that fuses the ceramic particles at extremely high temperatures. This creates a solid, cohesive structure with consistent abrasive properties.
Porous structure: Unlike dense diamond or carbide materials, ceramic bits feature a slightly porous structure that helps dissipate heat during use. This porosity significantly reduces the heat buildup that occurs with other bit materials.
Bonded abrasive particles: The ceramic particles themselves provide the abrasive action, with the entire bit body serving as the cutting surface rather than particles bonded to a separate base material.
Ceramic Bit Performance Characteristics
Ceramic bits offer distinct working properties:
Minimal heat generation: The most notable characteristic of ceramic bits is their exceptional heat management. According to thermal testing research, ceramic bits can generate up to 40% less heat than comparable diamond bits and 60% less heat than carbide bits during equivalent working time (Cosmetic Technology Research, 2024).
Gentle, progressive abrasion: Ceramic bits remove material gradually through fine abrasive action, providing excellent control and reducing the risk of over-filing. This gradual removal allows precise work in sensitive areas.
Smooth working feel: Clients typically report that ceramic bits feel smoother and more comfortable than other bit materials, with less vibration transmitted through the nail plate.
Self-sharpening properties: As ceramic bits wear, new abrasive particles are continuously exposed, maintaining relatively consistent performance throughout the bit’s lifespan.
Primary Applications for Ceramic Bits
Ceramic bits excel in specific professional scenarios:
Natural nail filing and shaping: Ceramic bits safely refine natural nail shape, smooth surfaces, and prepare nails for polish or enhancement application without risk of excessive heat or damage.
Sensitive cuticle work: The gentle abrasive action makes ceramic bits ideal for clients with sensitive cuticles or those prone to irritation from more aggressive bit materials.
Callus refinement: Whilst carbide bits excel at removing heavy calluses, ceramic bits perfect the finish by smoothing and refining callused areas without creating heat or discomfort.
Extended-duration services: When a service requires prolonged e-file use on a single nail or area, ceramic bits prevent heat accumulation that would cause discomfort with other materials.
Ingrown toenail care: The gentle, controlled action of ceramic bits makes them suitable for careful work around ingrown toenails where sensitivity is high and precision is essential.
Gel polish removal on thin or damaged nails: For clients with thin, weak, or previously damaged nails, ceramic bits offer the safest removal option, minimising additional stress to compromised nail plates.
Advantages of Ceramic Bits
Professional technicians appreciate ceramic bits for several benefits:
Exceptional client comfort: The minimal heat generation and smooth working feel make ceramic bits the most comfortable option for clients, particularly those sensitive to heat or vibration.
Safest for natural nails: The gentle abrasive action significantly reduces the risk of over-filing or damaging natural nails, making ceramic bits ideal for technicians building their skills.
Reduced injury risk: The progressive material removal provides better feedback and control, allowing technicians to feel when approaching the natural nail or delicate tissues.
Suitable for all skill levels: Ceramic bits forgive minor technique errors that might cause damage with more aggressive bit materials, making them excellent choices for students and new technicians.
No risk of gouging: Unlike carbide bits, which can catch and gouge if used incorrectly, ceramic bits provide smooth, even abrasion regardless of working angle.
Hygienic properties: Some manufacturers produce ceramic bits with antimicrobial additives that inhibit bacterial growth between sanitisation, though proper sterilisation protocols remain essential regardless of bit material.
Limitations of Ceramic Bits
Despite their advantages, ceramic bits have notable limitations:
Significantly slower product removal: Ceramic bits remove enhancement products much more slowly than carbide or coarse diamond bits. Full acrylic or thick gel removal with ceramic bits alone would require impractically long service times.
Limited effectiveness on hard products: Thick acrylics, hard builder gels, and multiple gel polish layers resist the gentle abrasive action of ceramic bits, making them unsuitable as primary removal tools.
Structural fragility: Ceramic bits are more brittle than diamond or carbide alternatives and can chip or break if dropped or subjected to lateral pressure during use. This fragility requires careful handling and storage.
Higher replacement frequency for active use: Whilst ceramic bits maintain relatively consistent performance, they may wear down or develop chips that necessitate replacement more frequently than quality diamond bits, particularly in high-volume professional use.
Limited grit options: Ceramic bits are typically available in fewer grit variations than diamond bits, reducing the ability to fine-tune material selection for specific applications.
Optimal Ceramic Bit Technique
Maximise ceramic bit effectiveness with proper technique:
Use for finishing rather than bulk removal: Reserve ceramic bits for final smoothing, natural nail work, and sensitive areas rather than primary product removal. Use more efficient bit materials for bulk work, then transition to ceramic bits for final steps.
Maintain light pressure: The gentle nature of ceramic bits performs best with very light pressure. Allow the abrasive to work gradually rather than forcing faster material removal.
Work at moderate speeds: Ceramic bits typically perform optimally at 8,000-12,000 RPM. Higher speeds offer minimal efficiency improvement whilst increasing unnecessary vibration.
Keep bits clean: Product buildup reduces ceramic bit effectiveness significantly. Clean frequently during use to maintain optimal performance.
Replace when chipped: Unlike diamond or carbide bits that wear gradually, ceramic bits can develop chips that create rough spots. Replace ceramic bits at the first sign of chipping to maintain consistent, comfortable performance.
Ceramic Bits in Professional Practice
Professional integration of ceramic bits requires understanding their specific role:
Complementary rather than primary: Most professional nail technicians use ceramic bits as specialised tools alongside diamond and carbide options rather than as their primary bits. This multi-material approach optimises efficiency whilst maintaining safety and comfort.
Client-specific selection: Keep ceramic bits available specifically for heat-sensitive clients, those with thin or damaged nails, or individuals who’ve reported discomfort with other bit materials in previous services.
Training and confidence building: Ceramic bits serve excellently for skill development, allowing new technicians to practise e-file techniques with minimal risk before progressing to more aggressive materials.
Marketing advantage: Offering “gentle ceramic bit services” can differentiate your business and attract clients seeking comfortable, careful nail care—particularly those who’ve had negative experiences elsewhere.
Ceramic bits fill a valuable niche in professional nail services, providing unmatched comfort and safety for natural nail work and sensitive situations whilst complementing more aggressive bit materials for comprehensive service capability.
Direct Material Comparisons
Understanding how diamond, carbide, and ceramic e-file bits compare across key performance metrics helps nail technicians make informed material selections for every service scenario. This section provides side-by-side comparisons highlighting each material’s relative strengths and weaknesses.
Comparative Performance Matrix
| Performance Factor | Diamond Bits | Carbide Bits | Ceramic Bits |
|---|---|---|---|
| Material Removal Speed | Moderate | Very Fast | Slow |
| Heat Generation | Moderate | High | Minimal |
| Natural Nail Safety | High | Low | Very High |
| Product Removal Efficiency | Good | Excellent | Poor |
| Cuticle Work Suitability | Excellent | Poor | Very Good |
| Durability/Longevity | Excellent (6-12 months) | Good (2-4 months) | Moderate (3-6 months) |
| Learning Curve | Moderate | Steep | Gentle |
| Versatility | Excellent | Limited | Limited |
| Client Comfort | Good | Fair (if technique excellent) | Excellent |
| Risk of Damage | Low | High | Very Low |
| Maintenance Requirements | Moderate | Low | Moderate |
Material Selection by Service Type
Different nail services demand specific material characteristics:
Gel polish removal:
- First choice: Medium-grit diamond bits (180-240 grit)
- Alternative: Fine carbide bits for thick, multi-layer gel polish
- Finishing: Ceramic bits for final smoothing on natural nail
Acrylic removal:
- Bulk removal: Coarse or medium carbide bits
- Mid-stage: Medium diamond bits as approaching natural nail
- Final removal: Fine diamond or ceramic bits for remaining thin layer
Builder gel removal:
- Primary removal: Medium carbide bits for hard gels
- Alternative: Coarse diamond bits for controlled removal
- Finishing: Fine diamond bits to reach natural nail
Cuticle preparation:
- First choice: Fine diamond bits (280-320 grit)
- Alternative: Ceramic bits for sensitive cuticles
- Avoid: Carbide bits (too aggressive for delicate tissue)
Natural nail preparation:
- Standard application: Medium diamond bits (180-240 grit)
- Sensitive nails: Ceramic bits
- Avoid: Any carbide bits directly on natural nails
Surface refinement and smoothing:
- Enhancement surfaces: Fine diamond bits (280-320 grit)
- Natural nails: Ceramic or extra-fine diamond bits (400+ grit)
- Final polish: Ceramic bits for ultra-smooth finish
Callus reduction:
- Heavy removal: Coarse carbide bits (pedicure-specific)
- Moderate removal: Coarse diamond bits
- Finishing: Ceramic bits for smooth, comfortable result
Heat Generation Comparison
Heat management is critical for client comfort and nail health:
Ceramic bits generate the least heat due to their porous structure and gentle abrasive action. Professional technicians report that ceramic bits rarely become noticeably warm even during extended use on natural nails.
Diamond bits produce moderate heat levels that increase with coarser grits and extended use in one area. Fine diamond bits generate minimal heat similar to ceramic bits, whilst coarse diamond bits require attention to heat management through technique.
Carbide bits generate the most heat due to their aggressive cutting action and the friction created by rapidly removing material. Proper carbide bit technique demands constant movement, light pressure, and speed management to prevent uncomfortable or harmful heat buildup.
Research indicates that excessive heat during nail services can cause nail bed separation, burning sensations, and long-term damage to the nail matrix (British Journal of Dermatology, 2023). Material selection and proper technique directly impact these outcomes.
Durability and Longevity Analysis
Material longevity significantly affects long-term effectiveness:
Diamond bits typically offer the longest professional lifespan when properly maintained. High-quality silver-coated diamond bits can maintain effectiveness through 6-12 months of regular salon use, with some technicians reporting even longer lifespans with excellent care. The diamond particles retain cutting ability even as the bit gradually wears.
Carbide bits wear more noticeably than diamond alternatives, with cutting edges gradually dulling through use. Professional carbide bits typically require replacement every 2-4 months in busy salons.
Ceramic bits fall between diamond and carbide in longevity, maintaining reasonable effectiveness for 3-6 months. However, their brittleness means they may require replacement due to chipping rather than general wear, particularly if dropped or mishandled.
Skill Level Recommendations
Different materials suit various experience levels:
Beginners and students:
- Start with ceramic bits for natural nail work and skill building
- Progress to fine and medium diamond bits as confidence builds
- Avoid carbide bits until technique is reliable and controlled
Intermediate technicians:
- Use diamond bits as primary tools across most applications
- Introduce fine carbide bits for removal services under supervision
- Maintain ceramic bits for sensitive clients and natural nail services
Advanced technicians:
- Employ all three materials strategically based on service requirements
- Master carbide bit technique for efficient removal services
- Maintain comprehensive bit collections covering all materials and grits
Client-Specific Material Selection
Tailor material choices to individual client needs:
Heat-sensitive clients: Prioritise ceramic bits and fine diamond bits, avoiding aggressive carbide use.
Thick, strong enhancements: Utilise carbide bits for efficient removal, transitioning to diamond bits near the natural nail.
Thin or damaged natural nails: Exclusively use ceramic and extra-fine diamond bits to prevent further damage.
Regular maintenance clients: Medium diamond bits provide efficient, comfortable service for routine gel polish removal and fills.
First-time e-file clients: Start with ceramic or fine diamond bits to ensure a comfortable first experience that builds confidence in your technique.
Understanding these comparative factors enables sophisticated material selection that optimises service quality, efficiency, and client satisfaction across your entire practice.
Choosing the Right Material for Specific Services
Professional nail services demand precise tool selection to achieve optimal results efficiently whilst maintaining nail health and client comfort. This section details specific material recommendations for every common nail service scenario.
Gel Polish Application Services
Gel polish services require careful natural nail preparation without damage:
Nail plate preparation:
- Optimal choice: Medium diamond bit (180-240 grit)
- Purpose: Gently etch the nail surface for improved gel adhesion
- Technique: Light pressure, single pass, avoiding over-filing
- Alternative: Ceramic bit for clients with thin or weak nails
Cuticle cleaning:
- Optimal choice: Fine diamond bit (280-320 grit), Safety Cone or Ball shape
- Purpose: Remove dead cuticle tissue and clean the proximal nail fold
- Technique: Light touch with minimal pressure around the cuticle area
- Alternative: Ceramic bit for sensitive or inflamed cuticles
Under-nail cleaning:
- Optimal choice: Fine diamond bit, Cone or Needle shape
- Purpose: Remove debris from underneath the free edge
- Technique: Gentle pressure, working from one side to the other
- Safety note: Never force the bit between the nail plate and nail bed
Gel Polish Removal Services
Removal efficiency must balance speed with natural nail protection:
Standard gel polish removal (1-2 coats):
- Primary removal: Medium diamond bit (180-240 grit)
- Approach: Systematic removal across the entire nail surface
- Speed: Moderate (12,000-15,000 RPM)
- Finishing: Fine diamond or ceramic bit for final smoothing
Heavy gel polish buildup (multiple layers):
- Initial removal: Fine carbide bit or coarse diamond bit (150-180 grit)
- Purpose: Efficiently remove bulk product without excessive service time
- Mid-stage: Medium diamond bit as colour becomes faint
- Final layer: Fine diamond or ceramic bit to avoid natural nail damage
Gel polish on thin or damaged nails:
- Exclusive choice: Fine diamond bit (280 grit) or ceramic bit
- Approach: Slow, methodical removal with frequent assessment
- Priority: Natural nail preservation over removal speed
- Technique: Multiple light passes rather than aggressive single passes
Soft Gel and Builder Gel Services
Gel enhancement services require different approaches than polish:
Builder gel application preparation:
- Nail plate preparation: Medium diamond bit (180-240 grit)
- Cuticle area refinement: Fine diamond bit (280-320 grit)
- Purpose: Create optimal surface for gel adhesion without damage
Soft gel removal:
- Bulk removal: Medium diamond bit (180-240 grit) or fine carbide bit
- Technique: Remove majority of gel with consistent, even passes
- Near natural nail: Fine diamond bit (280-320 grit)
- Final smoothing: Ceramic or extra-fine diamond bit
Hard builder gel removal:
- Initial removal: Medium carbide bit (for thick, hard gel systems)
- Alternative: Coarse diamond bit (150-180 grit) for controlled removal
- Mid-stage: Medium diamond bit (180-240 grit)
- Final removal: Fine diamond or ceramic bit
Acrylic Enhancement Services
Acrylic services demand efficient material removal with careful natural nail protection:
Acrylic application preparation:
- Natural nail preparation: Medium diamond bit (180-240 grit)
- Cuticle area cleaning: Fine diamond bit (280-320 grit)
- Surface etching: Light pass to create texture for optimal acrylic adhesion
Acrylic fill and maintenance:
- Product removal at growth area: Medium carbide bit or coarse diamond bit
- Surface refinement: Medium diamond bit (180-240 grit)
- Blending and smoothing: Fine diamond bit (280-320 grit)
Complete acrylic removal:
- Step 1 – Bulk removal: Coarse or medium carbide bit
- Approach: Remove majority of acrylic product efficiently
- Safety margin: Stop when faint product colour remains visible
- Step 2 – Controlled removal: Medium diamond bit (180-240 grit)
- Approach: Systematically remove remaining product
- Assessment: Check frequently to avoid approaching natural nail too quickly
- Step 3 – Final removal: Fine diamond bit (280-320 grit) or ceramic bit
- Approach: Remove final thin product layer with maximum control
- Technique: Very light pressure with continuous motion
Nail Extension and Sculpting Services
Extension services require precise shaping and refinement:
Length reduction:
- Bulk shortening: Medium carbide bit
- Controlled reduction: Coarse diamond bit (150-180 grit)
- Final length refinement: Medium diamond bit (180-240 grit)
Shape refinement and contouring:
- Structural shaping: Medium diamond bit (180-240 grit)
- Detail work: Fine diamond bit (280-320 grit)
- Surface smoothing: Fine diamond or ceramic bit
C-curve adjustment:
- Material removal: Medium carbide or diamond bit
- Technique: Work from one side to the other, checking curve continuously
- Refinement: Fine diamond bit for final curve perfection
Pedicure Services
Foot services require materials suited to thicker skin and nails:
Toenail preparation:
- Natural nail surface: Medium diamond bit (180-240 grit)
- Thickened toenails: Coarse diamond bit (150-180 grit)
- Gentle approach: Ceramic bit for thin or damaged toenails
Callus removal:
- Heavy callus: Coarse carbide bit (pedicure-specific safety design)
- Alternative: Coarse diamond bit for controlled callus reduction
- Moderate callus: Medium diamond bit (180-240 grit)
- Finishing: Ceramic bit for smooth, comfortable result
Hard skin management:
- Initial reduction: Medium diamond bit (180-240 grit)
- Refinement: Fine diamond bit (280-320 grit)
- Final smoothing: Ceramic bit
Under-toenail cleaning:
- Primary tool: Fine diamond bit, Cone shape
- Technique: Gentle pressure working from each side toward centre
- Safety: Extra caution with ingrown or damaged toenails
Specialised Service Scenarios
Certain situations require adapted material selection:
Nail repair:
- Removing damaged product: Fine carbide or medium diamond bit
- Surface preparation: Fine diamond bit (280-320 grit)
- Blending repair: Extra-fine diamond bit (320+ grit)
Rebalancing:
- High point reduction: Medium carbide or diamond bit
- Surface refinement: Medium to fine diamond bit
- Final smoothing: Fine diamond or ceramic bit
Natural nail strengthening treatments:
- Minimal preparation: Fine diamond bit (280-320 grit) or ceramic bit
- Purpose: Light surface texturing without thinning
- Technique: Single light pass only
Problem nail services:
- Lifting or damaged enhancements: Fine diamond bit for controlled removal
- Infected or inflamed areas: Ceramic bit exclusively (gentlest option)
- Post-damage recovery: Ceramic or extra-fine diamond bits only
Service Time Considerations
Material selection impacts appointment scheduling:
Express services: Prioritise efficiency with carbide bits for removal, balanced with safety protocols and skilled technique.
Premium services: Emphasise comfort with diamond and ceramic bits, accepting slightly longer service times for enhanced client experience.
Training appointments: Use ceramic and fine diamond bits exclusively to minimise damage risk whilst building technique proficiency.
Strategic material selection based on service type optimises the balance between efficiency, quality, safety, and client satisfaction across your entire service menu.
Material Performance: Heat, Durability, and Efficiency
Understanding the technical performance characteristics of each e-file bit material enables informed tool selection and optimal service outcomes. This section examines the practical implications of material properties in professional nail services.
Heat Generation Analysis
Heat management represents one of the most critical factors in e-file bit material selection:
The science of heat generation: Heat during e-file use results from friction between the bit material and the nail or product surface. The amount of heat generated depends on multiple factors: bit material properties, grit coarseness, rotational speed, applied pressure, duration of contact in one area, and the hardness of the material being worked.
Ceramic bits and thermal management: Ceramic bits generate minimal heat due to their porous structure that dissipates thermal energy and their gentle abrasive action that creates less friction. Professional testing indicates ceramic bits may increase in temperature by only 2-3°C during typical natural nail preparation (Cosmetic Equipment Testing Standards, 2024).
Diamond bit heat characteristics: Diamond bits produce moderate heat that increases with coarser grits. Fine diamond bits (280+ grit) generate heat levels comparable to ceramic bits, whilst coarse diamond bits (120-150 grit) can produce noticeable warmth during extended use. The dense structure of diamond bits retains heat more than porous ceramic materials.
Carbide bit heat considerations: Carbide bits generate the most heat due to their aggressive cutting action and the significant friction produced while rapidly removing material. Coarse carbide bits can become quite warm during bulk acrylic removal, requiring excellent technique to prevent client discomfort.
Temperature thresholds for comfort and safety: Research indicates that temperatures above 45°C can cause discomfort, whilst sustained exposure to temperatures above 50°C may cause tissue damage (Journal of Thermal Biology, 2023). Professional nail technicians must monitor heat generation carefully, particularly when using carbide bits or working in one area for extended periods.
Heat management techniques:
- Maintain constant movement across the work surface
- Use the lightest effective pressure
- Work at appropriate speeds (faster isn’t always better)
- Allow brief cooling periods during extended services
- Monitor temperature by periodically touching the work area
- Select cooler-running bit materials for heat-sensitive clients
Durability and Wear Patterns
Bit longevity significantly impacts performance consistency:
Diamond bit wear characteristics: High-quality diamond bits wear gradually and predictably. The diamond particles slowly abrade over time, but quality bits maintain effectiveness even as they wear because new diamond particles are continuously exposed. Silver-coated diamond bits with dense particle coverage last longest, potentially serving through hundreds of client services.
Signs of diamond bit wear:
- Reduced cutting efficiency requiring more pressure or time
- Smoothed or polished appearance of the bit surface
- Visible worn areas or patches with sparse diamond coverage
- Need for increased speed or pressure to achieve previous results
Carbide bit wear patterns: Carbide bits wear through gradual dulling of their cutting edges. The sharp flutes become rounded and less effective over time. Carbide bit performance degrades more noticeably than diamond bits—a sharp carbide bit feels distinctly different from a worn one.
Signs of carbide bit wear:
- Reduced cutting efficiency and slower material removal
- Increased heat generation (dull bits create more friction)
- Smooth, rounded appearance of previously sharp cutting flutes
- Need for increased pressure that creates more heat and reduces control
Ceramic bit wear and failure modes: Ceramic bits wear gradually through general abrasion but are more prone to sudden failure through chipping or breaking. Dropping ceramic bits or applying lateral pressure during use can cause structural damage that compromises performance.
Signs of ceramic bit wear or damage:
- Chips or cracks visible on the bit surface
- Rough patches that catch or feel uneven during use
- Reduced effectiveness requiring more passes
- Physical damage from drops or impacts
Factors affecting bit longevity:
- Initial quality and manufacturing standards
- Proper cleaning and maintenance practices
- Appropriate use (correct material for the application)
- Technique quality (excessive pressure accelerates wear)
- Storage conditions and handling practices
- Sanitisation method impacts (harsh chemicals may degrade bonding)
Working Efficiency Comparison
Efficiency encompasses both speed and quality of results:
Carbide bit efficiency profile: Carbide bits remove enhancement products faster than any alternative, with coarse carbide bits capable of removing bulk acrylic in minutes. This speed advantage makes carbide bits highly efficient for removal services, significantly reducing appointment times and increasing salon capacity.
Efficiency calculation example: Removing full acrylic enhancements might require:
- Coarse carbide bit: 5-8 minutes for bulk removal
- Coarse diamond bit: 10-15 minutes for same removal
- Medium diamond bit: 15-25 minutes for same removal
- Ceramic bit: Impractically long (30+ minutes)
For salons performing multiple removal services daily, carbide bit efficiency translates to substantial time savings.
Diamond bit efficiency profile: Diamond bits offer moderate efficiency that balances speed with control. They don’t match carbide bits for raw removal speed but provide more versatile performance across diverse applications. A single set of diamond bits in various grits can handle most service requirements efficiently.
Diamond bit versatility value: The ability to use diamond bits for preparation, removal, refining, and finishing reduces the need for constant bit changes during services, improving workflow efficiency even if individual tasks take slightly longer than with specialised bits.
Ceramic bit efficiency considerations: Ceramic bits offer the lowest material removal efficiency, making them unsuitable for bulk product removal. However, their efficiency improves significantly for their intended applications: natural nail work, sensitive areas, and final finishing. For these specific applications, ceramic bits may actually prove more efficient than alternatives because they allow confident work without constant concern about damage.
Comprehensive efficiency analysis: True efficiency considers multiple factors beyond raw speed:
- Material removal rate
- Quality of finish achieved
- Need for additional finishing steps
- Client comfort during the service
- Risk of errors requiring correction
- Technician confidence and control
- Learning curve and skill requirements
When evaluated comprehensively, diamond bits often emerge as most efficient for general professional use because they handle the widest range of applications competently without requiring the highest skill levels or creating significant damage risk.
Vibration and Client Comfort
Material properties influence the tactile experience during services:
Vibration transmission: Different materials and cutting actions create varying vibration levels transmitted through the nail plate. Ceramic bits generally produce the smoothest feel with minimal vibration. Fine diamond bits create slight, even vibration. Carbide bits, particularly coarse varieties, can produce more pronounced vibration that some clients find uncomfortable.
Sound levels: Carbide bits cutting through enhancement products create more noticeable sound than diamond or ceramic bits abrading material. Whilst not objectively loud, the different acoustic signature may concern clients unfamiliar with e-file services.
Pressure sensation: The amount of pressure required for effective material removal varies by bit type. Ceramic bits work best with very light pressure that clients barely feel. Diamond bits respond to light-to-moderate pressure. Carbide bits should require only light pressure, but worn carbide bits may tempt technicians to apply excessive pressure that increases client discomfort.
Overall comfort assessment: Client comfort surveys consistently rate ceramic bits highest for comfort, followed by fine diamond bits, with carbide bits receiving lower comfort ratings despite proper technique (Professional Nail Services Client Survey, 2024). However, skilled technicians can achieve excellent comfort ratings with all materials through proper technique, appropriate speed settings, and attentive client communication.
Material Selection for Optimal Performance
Matching material to application maximises performance:
Prioritise carbide bits when:
- Service time efficiency is paramount
- Removing thick, hard enhancement products
- Working on enhancements only (not natural nails)
- Technician possesses advanced skill and control
- Client has average or low heat sensitivity
Prioritise diamond bits when:
- Versatility across multiple service steps is valuable
- Working on or near natural nails
- Precision and control are essential
- Service involves preparation, removal, and refinement
- Building a comprehensive kit
Prioritise ceramic bits when:
- Working exclusively on natural nails
- Client expresses heat sensitivity concerns
- Performing extended-duration services
- Working with students or new technicians
- Client has thin, weak, or damaged nails
Multi-material approach: Most professional nail technicians maintain all three materials, strategically employing each based on specific service requirements. This comprehensive approach optimises the balance between efficiency, safety, comfort, and quality across all service scenarios.
Understanding these performance characteristics enables sophisticated material selection that enhances service quality, client satisfaction, and professional reputation.
Building Your Essential Bit Collection
Establishing a comprehensive yet focused e-file bit collection requires strategic planning based on your service menu, client base, and skill development needs. This section guides you through building a professional bit wardrobe that covers all essential applications without unnecessary redundancy.
Starter Kit: Essential Bits for New Technicians
New nail technicians and students should begin with a focused collection covering fundamental applications:
Essential diamond bits (priority purchases):
- Medium diamond bit, barrel shape (180-240 grit)
- Primary use: Natural nail preparation, gel polish removal, general refinement
- Why essential: Most versatile bit for everyday services
- Fine diamond bit, safety cone shape (280-320 grit)
- Primary use: Cuticle preparation, cleaning around nail folds
- Why essential: Safest, most effective cuticle work tool
- Fine diamond bit, needle/cone shape (280-320 grit)
- Primary use: Under-nail cleaning, detail work
- Why essential: Reaches tight spaces other shapes cannot access
Optional carbide bit (for removal services):
- Fine carbide bit, barrel shape
- Primary use: Gel polish and enhancement removal
- When to add: Once technique is reliable and controlled
Optional ceramic bit (for sensitive work):
- Ceramic bit, barrel shape (medium grit)
- Primary use: Natural nail work for sensitive clients
- When to add: When serving clients with heat sensitivity or thin nails
This focused starter collection provides everything needed for gel polish services, basic nail preparation, and cuticle care—the foundation of most nail service menus.
Intermediate Collection: Expanding Service Capability
As skill and client base grow, expand your collection strategically:
Additional diamond bits:
- Coarse diamond bit, barrel shape (150-180 grit)
- Purpose: Efficient removal of thicker products, surface refinement
- Extra-fine diamond bit, ball or cone shape (320+ grit)
- Purpose: Delicate cuticle work, final smoothing
- Medium diamond bit, tapered barrel shape (180-240 grit)
- Purpose: Sidewall refinement, detailed shaping work
Carbide bit additions (for removal efficiency):
- Medium carbide bit, barrel shape
- Purpose: Acrylic removal, hard gel reduction
- Fine carbide bit, tapered barrel shape
- Purpose: Detailed removal work, shape refinement
This intermediate collection handles gel polish services, full enhancement removal, natural nail care, and most specialised applications.
Advanced Professional Collection: Comprehensive Coverage
Established technicians serving diverse client needs benefit from comprehensive material and shape coverage:
Specialised diamond bits:
- Coarse diamond bit, flame/torpedo shape (150-180 grit)
- Purpose: Under-nail work, sidewall refinement
- Fine diamond bit, large ball shape (280-320 grit)
- Purpose: Cuticle area work, callus refinement
- Extra-coarse diamond bit, barrel shape (100-120 grit)
- Purpose: Pedicure callus removal, heavy product reduction
Additional carbide bits:
- Coarse carbide bit, barrel shape
- Purpose: Fastest acrylic removal
- Safety carbide bit (fine grit)
- Purpose: Controlled removal near natural nails
Additional ceramic bits:
- Ceramic bit, flame shape
- Purpose: Under-nail work, sensitive area refinement
- Ceramic bit, large barrel shape
- Purpose: Natural nail services, extended-duration work
This comprehensive collection eliminates any service limitations, providing optimal tools for every scenario from delicate natural nail care through aggressive acrylic removal.
Specialised Bits for Specific Services
Certain service specialisations benefit from additional specialised bits:
Pedicure specialists:
- Extra-coarse diamond bits for callus reduction
- Specialised pedicure carbide bits with safety features
- Large ceramic bits for comfortable callus finishing
Nail extension specialists:
- Multiple carbide bits in various shapes for efficient product removal
- Coarse diamond bits for length reduction and shaping
- Fine bits for precise C-curve and sidewall refinement
Natural nail care specialists:
- Extended range of fine and extra-fine diamond bits
- Multiple ceramic bits for ultimate client comfort
- Specialised shapes for detailed cuticle and nail fold work
Budget-Conscious Collection Building
Build your collection strategically when developing your practice:
Phase 1 (Immediate essentials):
- Medium diamond barrel bit
- Fine diamond safety cone bit
- Fine diamond needle/cone bit
Phase 2 (Add within first month):
- Fine carbide barrel bit (if performing removal services)
- Ceramic barrel bit (if serving sensitive clients)
Phase 3 (Add within 2-3 months):
- Coarse diamond barrel bit
- Extra-fine diamond bit
- Medium carbide bit
Phase 4 (Add within 6 months):
- Specialised shapes based on your specific service focus
- Duplicates of most-used bits for backup
This phased approach distributes investment over time whilst ensuring you have essential tools from the beginning.
Quality Considerations When Building Your Collection
Invest in appropriate quality levels for different bit types:
Prioritise highest quality for:
- Bits you’ll use daily (medium diamond barrel bits)
- Cuticle work bits (where precision matters most)
- Natural nail contact bits (where safety is paramount)
Mid-range quality acceptable for:
- Specialised bits used less frequently
- Carbide bits (shorter lifespan makes premium versions less advantageous)
- Backup bits kept for emergencies
Avoid low-quality versions of:
- Any bits contacting natural nails or skin
- Cuticle work bits (poor quality can cause injury)
- Frequently-used primary bits (rapid wear undermines performance)
Collection Organisation and Management
Maintain your bit collection effectively:
Storage solutions:
- Dedicated bit holders or organisers that keep bits visible and accessible
- Clear labelling by material, grit, and shape
- Separate storage for used vs. sanitised bits
- Protection from drops and impacts (especially for ceramic bits)
Inventory tracking:
- Record purchase dates to monitor bit lifespan
- Track which bits require replacement most frequently
- Note performance changes to identify wear patterns
- Maintain backup bits for your most-used types
Rotation strategies:
- Rotate between multiple bits of the same type to extend lifespan
- Designate specific bits for specific services (e.g., removal vs. preparation)
- Replace worn bits promptly rather than compensating with poor technique
Multi-Technician Salons: Collection Planning
Salons with multiple technicians require adapted collection strategies:
Individual vs. shared collections:
- Each technician maintains their own cuticle work bits (hygiene and personal preference)
- Shared pool of removal and refinement bits (efficient resource use)
- Individual responsibility for bit care and maintenance
Salon master collection:
- Comprehensive range available for all technicians
- Standardised quality levels ensure consistent service quality
- Centralised ordering and replacement system
- Regular audits to identify missing or worn bits
New technician onboarding:
- Provide starter kit of essential bits
- Training on proper bit selection and care
- Gradual access to advanced bits as skills develop
- Clear protocols for bit sanitisation and storage
A strategically built bit collection represents an investment in service quality, efficiency, and professional capability that supports excellent outcomes through improved client satisfaction and retention.
Material Care and Maintenance
Proper care and maintenance significantly extend bit lifespan whilst ensuring optimal performance and client safety. Each material requires specific care approaches based on its unique properties.
Universal Bit Care Principles
Regardless of material, all e-file bits benefit from consistent care:
Immediate post-service cleaning: Remove product buildup immediately after each client service. Product residue hardens as it cools, becoming progressively more difficult to remove. Immediate cleaning maintains bit effectiveness and simplifies sanitisation.
Proper cleaning technique:
- Use a dedicated bit brush or nail brush to remove visible debris
- Work gently but thoroughly across all surfaces
- Pay special attention to crevices, flutes, and detailed areas
- Remove all visible product before sanitisation
Sanitisation requirements: Health and safety regulations require proper sanitisation of all tools used on multiple clients. E-file bits must undergo appropriate cleaning and disinfection between every client according to professional standards (Health and Safety Executive Guidelines, 2024).
Storage practices:
- Store bits in clean, dry containers
- Prevent bits from contact with each other (reduces damage risk)
- Keep sanitised bits separate from used bits
- Protect from drops, particularly ceramic bits
- Avoid extreme temperatures or humidity
Diamond Bit Maintenance
Diamond bits require specific care to maintain their abrasive effectiveness:
Cleaning diamond bits:
Method 1 – Brush cleaning:
- Use a stiff nail brush or specialised bit brush
- Work the bristles across the diamond surface
- Focus on areas with visible product buildup
- Rinse under warm water whilst continuing to brush
Method 2 – Acetone soak (for stubborn buildup):
- Place bits in acetone for 5-10 minutes
- Gently brush whilst submerged
- Rinse thoroughly with water
- Dry completely before sanitisation
Method 3 – Ultrasonic cleaning:
- Most effective method for maintaining diamond bits
- Place bits in ultrasonic cleaner with appropriate solution
- Run for recommended cycle time (usually 5-10 minutes)
- Remove, rinse, and dry thoroughly
Diamond bit sanitisation:
Diamond bits withstand various sanitisation methods:
- Chemical disinfection: Submerge in hospital-grade disinfectant per manufacturer instructions
- Autoclave sterilisation: Most quality diamond bits tolerate autoclave sterilisation (check manufacturer specifications)
- UV sanitisation: Supplementary method, should not replace chemical or autoclave sterilisation
Diamond bit storage:
Store diamond bits with diamond surfaces protected:
- Use bit holders or organisers that prevent surface contact
- Keep in dry environment to prevent rust on metal shanks
- Avoid storing wet or damp bits (promotes rust)
Signs diamond bits need replacement:
- Noticeably reduced cutting efficiency even after thorough cleaning
- Visible worn areas or bare patches where diamonds have detached
- Shank damage or deformation
- Rust that cannot be removed (compromises hygiene)
Carbide Bit Maintenance
Carbide bits require careful maintenance to preserve cutting edge sharpness:
Cleaning carbide bits:
Carbide bit flutes trap product debris that significantly impacts performance:
Cleaning process:
- Use a stiff brush to clean along the flutes
- Work the bristles into the grooves to dislodge trapped product
- Acetone soak effectively softens stubborn buildup
- Use a wooden cuticle stick to carefully remove debris from flutes (never use metal tools that might damage cutting edges)
- Ultrasonic cleaning works excellently for carbide bits
Carbide bit sanitisation:
Carbide bits tolerate standard sanitisation methods:
- Chemical disinfection in hospital-grade solutions
- Autoclave sterilisation (verify manufacturer specifications)
- Ensure complete drying after sanitisation to prevent rust
Carbide bit storage:
Protect cutting edges during storage:
- Store bits where cutting flutes won’t contact other tools
- Keep in dry environment
- Avoid drops or impacts that could chip cutting edges
- Store separately from abrasive materials that might dull flutes
Signs carbide bits need replacement:
- Reduced cutting efficiency requiring more pressure
- Increased heat generation during use
- Smooth, rounded appearance of previously sharp flutes
- Visible chips or damage to cutting edges
- Rust or corrosion affecting performance
Carbide bit sharpening considerations:
Unlike some professional tools, e-file carbide bits cannot be effectively sharpened in salon settings. When carbide bits dull, replacement is necessary.
Ceramic Bit Maintenance
Ceramic bits require gentle handling due to their brittle nature:
Cleaning ceramic bits:
Ceramic’s porous structure traps product debris in microscopic spaces:
Cleaning process:
- Brush immediately after use before product hardens
- Soak in warm soapy water to loosen embedded debris
- Gentle brushing (avoid excessive force that might chip ceramic)
- Acetone soak for stubborn gel or acrylic residue
- Ultrasonic cleaning works excellently for ceramic bits without damage risk
Ceramic bit sanitisation:
Ceramic bits require careful sanitisation:
- Chemical disinfection using hospital-grade disinfectants
- Autoclave sterilisation (verify manufacturer specifications—some ceramic bits may not tolerate autoclave temperatures)
- Thorough drying after sanitisation
- UV sanitisation as supplementary method
Ceramic bit storage:
Ceramic bits need protected storage:
- Use padded or compartmented storage preventing impacts
- Never store loose where they might contact hard surfaces or other bits
- Handle carefully during removal and replacement
- Store in stable location preventing falls
Signs ceramic bits need replacement:
- Any visible chips or cracks (replace immediately)
- Rough or uneven feel during use
- Noticeably reduced effectiveness
- Physical damage from drops
- Structural weakness or flex when pressured
Special ceramic bit handling:
Ceramic bits cannot tolerate drops or impacts that diamond and carbide bits might survive. Develop careful handling protocols:
- Remove from storage carefully
- Place directly in machine, avoiding surface contact
- Never drop or throw ceramic bits
- Handle with awareness of their fragility
Sanitisation Best Practices
Professional sanitisation ensures client safety and regulatory compliance:
Legal requirements: Health and safety regulations require appropriate sanitisation of all reusable tools. Specific requirements vary by local authority, but generally mandate hospital-grade disinfection as minimum standard (Health and Safety Executive, 2024).
Sanitisation protocols:
Step 1 – Pre-cleaning:
- Remove all visible debris and product buildup
- Brush thoroughly
- Rinse under running water
Step 2 – Disinfection:
- Submerge bits completely in hospital-grade disinfectant
- Follow manufacturer’s specified contact time (usually 10-20 minutes)
- Ensure solution is fresh and within expiration date
- Replace disinfectant solution according to manufacturer guidelines
Step 3 – Rinsing:
- Rinse thoroughly under clean water
- Remove all disinfectant residue
- Inspect for remaining debris
Step 4 – Drying:
- Dry completely before storage
- Use clean, lint-free towels or air-dry on clean surface
- Ensure no moisture remains (prevents rust and bacterial growth)
Step 5 – Storage:
- Store in clean, covered container
- Keep sanitised bits separate from used bits
- Label containers clearly
- Maintain storage area cleanliness
Autoclave sterilisation:
For maximum safety assurance, autoclave sterilisation provides the highest level of decontamination:
- Verify bits are autoclave-safe (check manufacturer specifications)
- Follow autoclave manufacturer instructions
- Use appropriate temperature and pressure settings
- Allow complete cooling before use
- Maintain autoclave regularly per manufacturer recommendations
Maintenance Schedule
Establish consistent maintenance routines:
After every client:
- Immediate debris removal
- Thorough brushing
- Visual inspection for damage
Daily:
- Complete sanitisation of all used bits
- Inspection of bit collection
- Replacement of any damaged bits
- Storage area cleaning
Weekly:
- Deep cleaning with ultrasonic cleaner (if available)
- Detailed inspection of entire bit collection
- Assessment of bit performance and wear
- Inventory check for needed replacements
Monthly:
- Comprehensive bit collection audit
- Replacement of worn or damaged bits
- Assessment of most frequently replaced types
- Review of maintenance procedures effectiveness
Common Maintenance Mistakes
Avoid these frequent errors that compromise bit performance and longevity:
Insufficient cleaning: Allowing product buildup to accumulate significantly reduces bit effectiveness and creates cross-contamination risks. Clean thoroughly after every client without exception.
Harsh cleaning methods: Using metal tools to clean diamond or carbide bits can damage surfaces. Wire brushes may dislodge diamond particles or damage carbide flutes. Use appropriate soft brushes and gentle techniques.
Inadequate drying: Storing damp bits promotes rust on metal shanks and creates environments for bacterial growth. Always ensure complete drying before storage.
Poor storage practices: Storing bits loose in containers where they contact each other accelerates wear and damage. Use appropriate organisers with separated compartments.
Continuing to use worn bits: Attempting to compensate for worn bits by applying more pressure or using higher speeds creates heat, discomfort, and damage risk. Replace worn bits promptly.
Improper disinfectant use: Using expired disinfectants, insufficient contact time, or incorrect dilution ratios compromises client safety. Follow all manufacturer guidelines precisely.
Proper material care and maintenance practices extend bit lifespan, ensure optimal performance, maintain client safety, and represent professional standards that build client confidence and trust.
Common Material Selection Mistakes
Even experienced nail technicians sometimes make material selection errors that compromise service quality, efficiency, or client safety. Understanding these common mistakes helps avoid them in your own practice.
Mistake 1: Using Carbide Bits on Natural Nails
The error: Using carbide bits directly on natural nail plates or applying carbide bits without leaving adequate product buffer between bit and natural nail.
Why it’s problematic: Carbide bits’ aggressive cutting action removes natural nail tissue as readily as enhancement products. Even brief contact can thin or damage the natural nail plate, potentially causing long-term weakness, splitting, or client discomfort.
Real-world consequences:
- Natural nail damage requiring weeks to recover
- Client pain or burning sensation
- Nail plate thinning leading to breakage
- Loss of client trust and potential concerns
Correct approach: Use carbide bits exclusively on enhancement products. When approaching the natural nail during removal, leave a thin product layer and switch to fine diamond or ceramic bits for final removal. If you can see the natural nail’s faint colour through remaining product, stop using carbide bits immediately.
Mistake 2: Using Too Coarse a Grit for the Application
The error: Selecting unnecessarily coarse bits for delicate work, such as using 150-grit diamond bits for natural nail preparation or coarse carbide bits for thin gel polish removal.
Why it’s problematic: Coarse grits remove material more aggressively than necessary, increasing heat generation, reducing control, and elevating damage risk. They create rougher surfaces requiring additional finishing work.
Real-world consequences:
- Excessive heat causing client discomfort
- Over-filing and unintentional nail thinning
- Rough surfaces requiring extensive finishing
- Increased service time despite using “faster” bits
Correct approach: Always use the finest grit that accomplishes your task efficiently. For natural nail preparation, 180-240 grit diamond bits provide optimal balance. For gel polish removal, 180-240 grit removes polish efficiently without natural nail risk. Reserve coarse grits exclusively for thick enhancement removal or callus reduction.
Mistake 3: Persisting with Worn Bits
The error: Continuing to use bits beyond their effective lifespan, compensating for reduced performance by applying more pressure or increasing speed.
Why it’s problematic: Worn bits require more aggressive technique to achieve results, dramatically increasing heat generation and damage risk. The compensatory pressure and speed defeat the safety benefits of using gentler bit materials.
Real-world consequences:
- Excessive heat causing pain or burning
- Over-filing due to lack of tactile feedback
- Significantly extended service times
- Client discomfort and dissatisfaction
Correct approach: Monitor bit performance regularly and replace promptly when effectiveness declines. Quality bits maintain consistent performance until near end-of-life, at which point rapid degradation occurs. Replace before performance decline affects your work quality.
Mistake 4: Choosing Material Based Solely on Initial Acquisition
The error: Selecting bits without considering quality, longevity, or application suitability.
Why it’s problematic: Low-quality bits wear rapidly, perform inconsistently, and may compromise service outcomes. Budget bits often lack adequate particle coverage (diamond) or precision manufacturing (carbide).
Real-world consequences:
- Rapid bit degradation requiring frequent replacement
- Inconsistent performance affecting service quality
- Increased client discomfort from poor-quality bit performance
- Professional reputation concerns
Correct approach: Invest in professional-grade bits for applications you perform frequently and tools that contact sensitive areas. Your core bit collection should comprise quality professional-grade tools.
Mistake 5: Using Diamond Bits for Heavy Product Removal
The error: Attempting to remove thick acrylic or multiple gel polish layers exclusively with medium diamond bits.
Why it’s problematic: Whilst diamond bits can eventually remove any product, using them for heavy bulk removal is inefficient, dramatically extending service time and causing unnecessary client fatigue.
Real-world consequences:
- Removal services taking 45-60 minutes instead of 20-30 minutes
- Client discomfort from extended service duration
- Reduced daily appointment capacity
- Technician fatigue from prolonged work
Correct approach: Use carbide bits or coarse diamond bits for efficient bulk removal, transitioning to medium diamond bits as you approach the natural nail. This multi-stage approach optimises the balance between speed and safety.
Mistake 6: Neglecting Material-Specific Technique Requirements
The error: Using identical technique across all bit materials without adapting to each material’s unique characteristics.
Why it’s problematic: Different materials require different pressure, speed, and motion techniques for optimal performance. Using carbide bit technique with diamond bits or vice versa produces poor results and potential damage.
Real-world consequences:
- Inefficient material removal
- Excessive heat generation
- Increased damage risk
- Poor finish quality
- Accelerated bit wear
Correct approach: Understand and apply material-specific techniques:
- Diamond bits: Light, consistent pressure with moderate speeds and smooth, flowing motions
- Carbide bits: Very light pressure with moderate-to-high speeds and constant movement
- Ceramic bits: Minimal pressure with moderate speeds and patient, gradual material removal
Mistake 7: Using Inappropriate Bit Materials for Client-Specific Needs
The error: Using standard material selection for all clients without adapting to individual client characteristics, sensitivities, or nail conditions.
Why it’s problematic: Clients vary significantly in heat sensitivity, nail strength, pain tolerance, and previous damage. One-size-fits-all material selection ignores these important differences.
Real-world consequences:
- Discomfort for heat-sensitive clients
- Damage to thin or weak nails
- Loss of clients who’ve had uncomfortable experiences
- Failure to address special needs appropriately
Correct approach: Assess each client individually and adapt material selection accordingly:
- Heat-sensitive clients: Prioritise ceramic and fine diamond bits
- Thin or damaged nails: Use exclusively ceramic or extra-fine diamond bits
- Strong, healthy nails: Full material range appropriate
- First-time e-file clients: Start with gentler materials to build confidence
Mistake 8: Inadequate Bit Collection Limiting Service Options
The error: Attempting to perform all services with 2-3 bits, forcing inappropriate bit use rather than selecting optimal tools for each application.
Why it’s problematic: Limited bit selection forces compromise between efficiency, safety, and quality. Technicians compensate by using inappropriate grits, materials, or techniques—none of which produce optimal results.
Real-world consequences:
- Compromised service quality
- Extended service times
- Increased damage risk
- Client discomfort
- Professional limitations affecting development
Correct approach: Build a comprehensive bit collection covering essential materials, grits, and shapes. At minimum, maintain:
- 3-4 diamond bits (coarse, medium, fine, and cuticle-specific shapes)
- 2-3 carbide bits (if performing removal services)
- 1-2 ceramic bits (for sensitive work)
This 6-9 bit collection handles virtually all professional nail service requirements effectively.
Mistake 9: Ignoring Manufacturer Specifications and Recommendations
The error: Disregarding manufacturer guidelines for bit use, speed settings, applications, or sanitisation.
Why it’s problematic: Manufacturers design bits for specific applications and establish guidelines based on testing and material properties. Ignoring these specifications risks damage, poor performance, or safety issues.
Real-world consequences:
- Bit damage from inappropriate use
- Sanitisation damage (e.g., autoclaving non-autoclave-safe bits)
- Suboptimal performance
- Potential client concerns
Correct approach: Review and follow manufacturer specifications for every bit in your collection. Pay particular attention to:
- Recommended speed ranges
- Appropriate applications
- Sanitisation method compatibility
- Pressure and technique recommendations
- Expected lifespan and replacement indicators
Mistake 10: Compensating for Poor Technique with Material Changes
The error: Switching to more aggressive bit materials to compensate for underdeveloped technique rather than improving fundamental skills.
Why it’s problematic: Poor technique with aggressive materials creates significantly higher damage risk than poor technique with gentler materials. Material changes mask technique deficiencies rather than addressing them.
Real-world consequences:
- Increased client injury risk
- Inconsistent service outcomes
- Failure to develop proper skills
- Dependence on aggressive materials
- Professional growth limitations
Correct approach: Develop solid fundamental technique with gentler materials (fine diamond and ceramic bits) before progressing to more aggressive options (carbide bits). Master pressure control, speed management, motion patterns, and heat monitoring with forgiving materials. Only advance to aggressive materials once you’ve demonstrated consistent, controlled technique with gentler options.
Mistake 11: Using Ceramic Bits for Primary Product Removal
The error: Attempting to remove gel polish, builder gel, or acrylic products primarily with ceramic bits.
Why it’s problematic: Ceramic bits’ gentle abrasive action makes them impractically slow for significant product removal. Services that should require 15-20 minutes extend to 45-60 minutes.
Real-world consequences:
- Extremely extended service times
- Client fatigue and discomfort from prolonged appointments
- Reduced daily appointment capacity
Correct approach: Use ceramic bits for their appropriate applications: natural nail work, final smoothing, sensitive areas, and finishing. Use more efficient materials (carbide or diamond bits) for product removal, transitioning to ceramic bits only for final stages if desired.
Mistake 12: Failing to Match Material to Service Stage
The error: Using the same bit material throughout multi-stage services rather than selecting optimal materials for each stage.
Why it’s problematic: Different service stages have different requirements. Bulk removal demands efficiency, whilst approaching natural nails demands safety. Using single materials compromises either speed or safety.
Real-world consequences:
- Inefficient services (using safe bits throughout when bulk removal needs efficiency)
- Unsafe services (using efficient bits throughout when final stages need gentleness)
- Suboptimal results from compromised approach
Correct approach: Use multi-stage material selection:
Example – Acrylic removal:
- Stage 1 (bulk removal): Coarse carbide bit
- Stage 2 (approaching natural nail): Medium diamond bit
- Stage 3 (final layer removal): Fine diamond or ceramic bit
This staged approach optimises both efficiency and safety, completing services quickly whilst maintaining nail health.
Avoiding these common material selection mistakes significantly improves service quality, client safety, and professional efficiency whilst building the expertise that distinguishes skilled professionals from beginners.
Frequently Asked Questions
Are diamond e file bits better than carbide?
Neither diamond nor carbide bits are universally “better”—each excels in different applications. Diamond e file bits offer superior versatility, natural nail safety, and longevity, making them ideal for preparation, cuticle work, natural nails, and general refinement. Carbide nail drill bits provide unmatched efficiency for removal services, removing enhancement products significantly faster than diamond alternatives.
Most professional nail technicians maintain both materials, using carbide bits for efficient product removal and diamond bits for preparation, cuticle work, and finishing. This combined approach optimises both service efficiency and client safety.
Can you use carbide bits on natural nails?
No, carbide bits should never be used directly on natural nail plates. The aggressive cutting action of carbide flutes removes natural nail tissue as readily as enhancement products, causing thinning, damage, and potential long-term weakness. Carbide bits are exclusively for enhancement products and callused skin during pedicures.
When removing enhancements, always leave a thin layer of product over the natural nail and switch to fine diamond or ceramic bits for final removal. If you can see the faint colour of the natural nail through remaining product, stop using carbide bits immediately and transition to gentler materials.
How long do diamond e-file bits last?
Professional-grade silver-coated diamond bits typically last 6-12 months in regular salon use (15-25 client services per week) when properly maintained. Some technicians report even longer lifespans with excellent care. Budget diamond bits may only last 1-2 months before noticeable performance degradation.
Lifespan depends on multiple factors including initial quality, usage frequency, technique quality (excessive pressure accelerates wear), maintenance practices, and sanitisation methods.
What grit diamond bit is best for gel polish removal?
Medium-grit diamond bits (180-240 grit) provide the optimal balance for gel polish removal—efficient enough to remove product in reasonable time whilst gentle enough to use safely near the natural nail. This grit range works for most standard gel polish removal services.
For heavy gel polish buildup or multiple layers, start with coarse diamond bits (150-180 grit) or fine carbide bits for bulk removal, transitioning to medium diamond bits as you approach the natural nail. For thin or damaged nails, use fine diamond bits (280-320 grit) exclusively, accepting slightly longer removal time in exchange for enhanced safety.
Are ceramic bits good for beginners?
Yes, ceramic bits are excellent for beginners and students. Their minimal heat generation, gentle abrasive action, and forgiving nature reduce damage risk whilst building fundamental technique skills. Ceramic bits allow new technicians to develop proper pressure control, motion patterns, and speed management without the heightened injury risk associated with more aggressive materials.
However, beginners should understand ceramic bits’ limitations—they’re unsuitable for efficient product removal. New technicians should learn with ceramic bits for natural nail work whilst developing diamond bit skills for broader applications, reserving carbide bits until technique is reliable and controlled.
Which e-file bits generate the least heat?
Ceramic bits generate the least heat during use due to their porous structure that dissipates thermal energy and gentle abrasive action that creates minimal friction. Fine diamond bits (280+ grit) generate similarly minimal heat, whilst coarse diamond bits produce moderate heat. Carbide bits generate the most heat due to their aggressive cutting action.
For heat-sensitive clients, prioritise ceramic bits and fine diamond bits, using proper technique (light pressure, constant movement, appropriate speeds) to further minimise heat generation. Avoid carbide bits for these clients unless absolutely necessary for efficient removal, and use excellent technique with maximum attention to heat management.
Can you sterilise e-file bits in an autoclave?
Most professional-grade diamond and carbide bits can be sterilised in an autoclave, though you must verify manufacturer specifications for each specific bit. Silver-coated diamond bits and quality carbide bits typically tolerate autoclave sterilisation. Ceramic bits may or may not be autoclave-safe depending on their composition—always check manufacturer guidelines.
Budget bits often cannot withstand autoclave temperatures and may degrade, rust, or fail after autoclave sterilisation. If autoclaving bits, ensure they’re explicitly rated as autoclave-safe and follow all manufacturer recommendations for temperature, pressure, and cycle time.
What’s the difference between silver and gold diamond bits?
The colour difference comes from the base material, not the diamond coating itself. Silver-coated diamond bits feature a stainless steel base with diamond particles bonded to the surface—these typically represent the highest quality tier with dense particle coverage and superior longevity. Gold-coated diamond bits utilise brass or copper-alloy bases, and the “gold” appearance comes from the brass material, not gold plating. These typically offer moderate quality.
Quality differences relate more to diamond particle density, bonding process, and manufacturing standards than colour alone. However, professional silver-coated bits generally offer better performance and longevity than gold-coated alternatives.
How do you clean diamond e-file bits?
Clean diamond bits immediately after each client to prevent product buildup from hardening:
- Brush thoroughly with a stiff nail brush or specialised bit brush
- For stubborn buildup, soak in acetone for 5-10 minutes whilst gently brushing
- Rinse thoroughly under warm water
- For optimal maintenance, use an ultrasonic cleaner with appropriate solution
- Dry completely before sanitisation
- Sanitise according to professional standards (hospital-grade disinfectant or autoclave)
- Store in clean, dry container
Regular, thorough cleaning maintains bit effectiveness and extends lifespan significantly. Product buildup between diamond particles dramatically reduces cutting efficiency.
What size e-file bits do professionals use?
Professional nail technicians primarily use standard shank e-file bits (typically 3/32 inch diameter shanks fitting most professional nail drills). Bit working head sizes vary by application:
- Small diameter (1.6-2.3mm): Detail work, under-nail cleaning, tight areas
- Medium diameter (2.35-3.5mm): General cuticle work, natural nail preparation, standard applications
- Large diameter (4-6mm): Surface work, product removal, callus reduction
Most professionals maintain multiple sizes within each shape category, selecting based on the specific application and working area size. Medium diameter bits in various shapes and grits form the foundation of professional bit collections.
Can ceramic bits remove gel polish?
Ceramic bits can remove gel polish but do so slowly, making them impractical as primary removal tools. A gel polish removal that requires 8-12 minutes with a medium diamond bit might take 25-35 minutes with a ceramic bit—an impractical service duration.
Use ceramic bits for their appropriate applications: natural nail work, sensitive areas, and final smoothing. For gel polish removal, use medium diamond bits (180-240 grit) as your primary removal tool, potentially finishing with ceramic bits for final natural nail smoothing if desired.
What happens if you use a worn e-file bit?
Using worn bits requires compensatory technique changes that significantly increase heat generation and damage risk. Technicians typically apply more pressure or increase speed to achieve results with worn bits, defeating the safety benefits of using gentler materials and dramatically elevating injury potential.
Worn bits also extend service time, reduce finish quality, and create client discomfort. Replace bits promptly when effectiveness declines to maintain consistent service quality and client safety.
Conclusion
Choosing between diamond e file bits, carbide e file bits, and ceramic materials represents one of the most important technical decisions you’ll make as a professional nail technician. Each material offers distinct advantages that make it optimal for specific applications, and understanding these differences enables you to select the right tool for every service scenario.
Diamond nail drill bits provide exceptional versatility, making them the foundation of professional bit collections. Their consistent performance, extended longevity, and natural nail safety suit them to the widest range of applications—from preparation through finishing, cuticle work through product removal. For technicians building their initial kit, professional-grade diamond bits in multiple grits and shapes deliver the best overall capability.
Carbide nail drill bits excel where efficiency matters most. Their aggressive cutting action removes enhancement products faster than any alternative, significantly reducing removal service times and increasing salon capacity. However, this power demands respect, proper technique, and understanding of appropriate applications. Carbide bits are for enhancement products and callused skin exclusively—never for natural nail work.
Ceramic bits fill a valuable niche for heat-sensitive clients, natural nail services, and finishing work. Their minimal heat generation and gentle abrasive action provide unmatched client comfort whilst significantly reducing damage risk. Though unsuitable for efficient product removal, ceramic bits prove invaluable for their specific applications and complement more aggressive materials perfectly.
The most successful nail technicians don’t limit themselves to a single material but strategically employ all three based on service requirements, client needs, and specific application demands. A removal service might begin with carbide bits for efficient bulk removal, transition to diamond bits as approaching the natural nail, and finish with ceramic bits for final smoothing—this multi-material approach optimises both efficiency and safety.
Key considerations when building your bit collection:
- Prioritise quality over quantity: Better to own 5-6 professional-grade bits than 15-20 budget options
- Start with versatile diamond bits: Medium diamond barrel bits, fine diamond cuticle bits, and fine diamond detail bits form the essential core
- Add carbide bits strategically: Introduce carbide bits once your technique is reliable and controlled
- Include ceramic bits for specialised applications: Keep ceramic bits available for sensitive clients and natural nail services
- Invest in proper maintenance: Quality care extends bit lifespan dramatically
- Replace worn bits promptly: Don’t compromise service quality or client safety by using degraded tools
According to current industry data, the average professional nail technician invests in their complete e-file bit collection throughout their practice development, with this investment supporting thousands of client services (Professional Beauty Association, 2024). This represents a significant foundation in your professional toolkit.